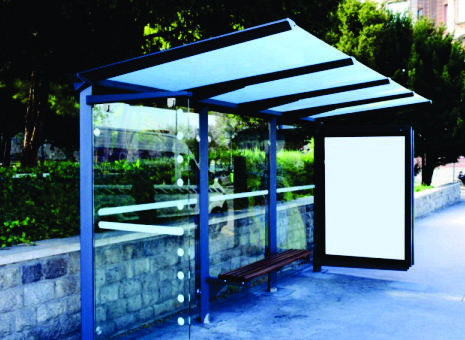
7 Essential steps to check for "How to build a Bus Stop Shelter"
Bus Stop Shelter is a necessity in the modern climatic conditions. Before constructing it we need to check various criterions so that the shelter built is the best one. So let’s discuss it point by point before we start building the Bus Stop shelter:
1. Obtain necessary permissions for bus stop enclosure
Let's look into the criterion which we need to consider to obtain necessary permissions for a bus stop enclosure
(i) Research Local Regulations: Let's start by checking out our local rules for making awesome bus stops! Find out about the right size, strong materials, and the perfect spot. It's like a guide to make sure our bus stop is top-notch. Get ready to be a bus stop pro!
(ii) Contact Local Authorities: Time to chat with the local pros! Reach out to the important folks like the town planners or transportation experts. Share your bus stop dreams and ask them about the special papers and approvals we need. They're the key to turning our bus stop vision into reality!
(iii) Permit Application Process: Become a bus stop building expert! Learn about the paper process – it's like a bus stop permission puzzle. Get the special forms and figure out what papers we need. We might need to draw cool plans, show off designs, and talk about the strong stuff we'll use. Let's get building!
(iv) Community Engagement: Time to team up with our neighbors! Throw a big gathering to talk about our bus stop plan. Share info, listen to thoughts, and answer questions. When the community is excited, we can get the thumbs up for our bus stop adventure! Let's make our town proud!
(v) Collaboration with Stakeholders: Find our bus stop heroes! Talk to the transportation experts, landowners, and neighborhood pals. Ask for their ideas and help – they're our bus stop team. Working together makes everything smoother. With their support, our bus stop will be a hit and match what the whole community wants!
2. Design & planning for modern bus shelters
After obtaining necessary permissions from authorities, the next thing we need to look at is design and planning of the modern bus shelters.
(i) Understand Community Needs: Start by talking to those who'll use the bus stop. What makes them comfy? Do they want shade or info? Knowing this helps create a design that suits everyone. Let's make a bus stop that's perfect for our community!
(ii) Choose a Suitable Location: Choose a spot that's easy to reach and see. Think about people walking, roads nearby, and safety. A good spot makes our bus stop handy for everyone. Let's find the perfect place for our bus adventure!
(iii) Create a User-Friendly Layout: Design with simplicity – it's like a clear map! Easy for folks to move around and find info. Think about where to sit, where to put signs, and how the shelter looks. Let's make our bus stop super friendly and easy to use!
(iv) Incorporate Safety Measures: Put safety on top! Plan for good lights, clear signs, and being seen from all sides. A safe design makes sure everyone feels comfy, especially in the evening or tricky weather. Let's create a bus stop that's safe and secure for everyone!
(v) Consider Sustainable Materials: Be a friend to nature! Pick materials that last, need less care, and help the environment. Green choices make our bus stop last longer and help our planet. Let's build a bus stop that's good for us and Mother Earth!

3. Material selection for bus station shelter
After considering the above 2 criterions the next important criterion is material selection. The best the material is, the longer it will last without collapsing.
(i) Durability Matters: Select stuff that can handle any weather and lots of people using it every day. Strong materials mean our bus station stays tough and lasts a long time, so we don't have to fix it too often. Let's build it strong and steady!
(ii) Low-Maintenance Solutions: Choose things that don't need much looking after. Easy-care materials save time and resources, keeping our bus station clean and nice without a lot of work. Let's make it simple to keep our bus stop spick and span!
(iii) Environmentally Friendly Options: Help our planet by picking materials that are good for the environment. Choosing eco-friendly stuff not only makes the Earth happy but also goes along with the trend of being kind to nature in building things. Let's build a bus stop that's a friend to our planet!
(iv) Cost-Effective Selection: Think about materials that are both good quality and don't cost too much. This way, we can build our bus station well and make sure it stays within our budget. It's like finding the perfect mix for a strong and safe bus stop!
(v) Aesthetic Appeal: Think about how it looks! Pick materials that not only do their job but also make our bus stop look cool. A nicely designed shelter makes waiting for the bus a better experience for everyone. Let's make our bus stop a little work of art!
4. Accessibility considerations for transit shelters
After fixing the material for the transit shelters we need to check where the material is being installed. It should be installed in the best place where people can get the best access for the shelter. So let’s check the factors to be considered:
(i) Accessible Design: Make sure everyone can use our bus stop! Think about people with disabilities. Include ramps or sloped paths so those in wheelchairs or with strollers can easily get to the shelter. Let's build a bus stop that everyone can use without any trouble!
(ii) Ample Seating and Waiting Space: Make sure there's plenty of space for everyone waiting at the bus stop. Have seats with back support for those waiting a long time. Keep open areas for people with mobility aids or larger groups. Let's make our bus stop comfy for everyone, no matter what they need!
(iii) Clear Signage and Information: Ensure the bus stop has clear signs with words and symbols. This helps people who can't see well or speak another language. Let's make sure everyone can understand the bus routes and schedules easily. Our bus stop should be clear for everyone!
(iv) Well-Lit Environment: Make sure our bus stop is bright and safe, even when it's dark or gloomy. Good lighting helps everyone, especially those who can't see well. This way, waiting for the bus is safer and more comfy for all. Let's keep our bus stop shining!
(v) Consideration for Diverse Needs: Think about everyone's needs at our bus stop. Include things for seniors, kids, and those with different abilities. Use features like special paving, different colors, and sounds that help everyone. Let's make our bus stop a friendly and inclusive place for everyone!
5. Environmental considerations for bus stop enclosure
The most important factor to consider is the environmental conditions for the bus stop enclosure to stand in the place. Let’s check the factors for these:
(i) Energy-Efficient Lighting: Pick lights that save energy, like LED bulbs. This helps use less electricity, cutting costs and being kind to the environment. Let's make our bus stop shine bright and green!
(ii) Rainwater Harvesting System: Capture rainwater with a special system. This helps save water and is good for our surroundings. We can even use it for making the area around our bus stop look beautiful. Let's collect rain and make our bus stop green!
(iii) Green Roof or Vegetative Covering: Think about putting plants on the roof or covering it with greenery. This not only makes our bus stop look pretty but also helps the environment. Plants can clean the air and keep the temperature just right. Let's make our bus stop a little garden!
(iv) Recyclable Materials: Choose materials that can be recycled for our bus stop. This means less waste and a friendlier approach to the environment. Let's build our bus stop using things that can be used again and again!
(v) Solar-Powered Amenities: Add solar panels to power things like lights or charging spots. Using the sun's energy is good for the environment. It's clean and doesn't leave a big carbon footprint like regular electricity. Let's make our bus stop shine with solar power!

6. Safety features of bus station shelter
Let’s consider the important safety features which we need to check for the bus station shelter before we construct such a marvel.
(i) Surveillance Cameras: Put up cameras for more safety. Cameras stop people from causing damage and make sure everyone is safe. They keep a close watch on the bus stop, making it a safe place for everyone. Let's make our bus stop secure with cameras!
(ii) Emergency Communication System: Have a way to ask for help fast! Install an emergency button or intercom for commuters. If there's an urgent problem, this helps get help quickly. It makes our bus stop safe and ensures help comes when it's needed. Let's keep our bus stop secure!
(iii) Well-Defined Exits and Entrances: Make it easy to find the way! Clearly mark where to enter and exit. This helps everyone move around without confusion, making our bus stop safe. Well-marked paths prevent accidents and keep things organized. Let's make our bus stop easy and safe to navigate!
(iv) Anti-Slip Flooring: Use floors that don't get slippery when it's wet. This keeps everyone safe, especially when it rains. Anti-slip floors help commuters move around without falling. Let's make sure our bus stop is safe and sound, rain or shine!
(v) Well-Lit Environment: Keep the bus stop bright! Use good lighting, especially when it gets dark or gloomy. Bright lights help everyone see well, stop bad things from happening, and make our bus stop a safe and comfy place. Let's keep our bus stop shining!
7. Installation of modern bus shelters:
The construction and Installation of modern bus shelters has majorly few steps. Let’s check it one by one:
(i) Start with a Solid Base: Start with a strong base for our bus stop. A solid foundation means it will stay steady and last a long time. It makes sure our bus stop is strong and reliable when we build it. Let's make it strong from the very beginning!
(ii) Precise Assembly of Components: Put together each part carefully, like following a recipe. Use the instructions or plans to do it right. Being precise when putting everything together is super important. It makes sure our bus stop is strong and works well. Let's build it just right!
(iii) Secure Fixtures and Attachments: Make sure everything is fixed tightly – like making sure screws are tight. Installing benches, signs, and all the parts securely is important. It keeps our bus stop safe and easy to use for everyone. Let's make sure everything is firmly in place!
(iv) Attention to Detail: Look closely at the details while setting up. Check if things are in line, spaced correctly, and put in the right spot for a neat and professional look. Paying attention to these details gives our bus stop a nice and finished appearance. Let's make it look great!
(v) Final Inspection and Testing: Do a final check and test everything. Make sure all parts are in the right place and our bus stop follows safety rules. Test things like lights and seats to be sure everything works well. Our bus stop should be all set for everyone to use!